
My First Part

This tutorial will teach you how to create the first part with the History API. We will start with a simple cylinder. Then, to get an idea about what's possible with the History API, we're going to make the model more and more complex.

Let's follow these steps:

  1. Create a simple cylinder
  2. Add some more features
  3. Add expressions to make the model configurable
  4. Save the model in native file format

1. Create a simple cylinder#

First, you must create a new code environment where you will make your first example.

  • Create a copy of templateCreator.ts in the history folder and name it, for example, cylinder.ts
  • You will now have an empty create method where you can put code into it.
import { ApiHistory, history } from '@buerli.io/headless'
import { Param, Create } from '../../store'
export const paramsMap: Param[] = [].sort((a, b) => a.index - b.index)
export const create: Create = async (apiType, params) => {
const api = apiType as ApiHistory
// Start creating your model here...
// ...
// ...
return 0 // product id
}
export const cad = new history()
export default { create, paramsMap, cad }

Before we can start creating the cylinder and other features, we need to create an empty part. In this part we put all our features into.

  • Create an empty part and name it "CylinderPart"
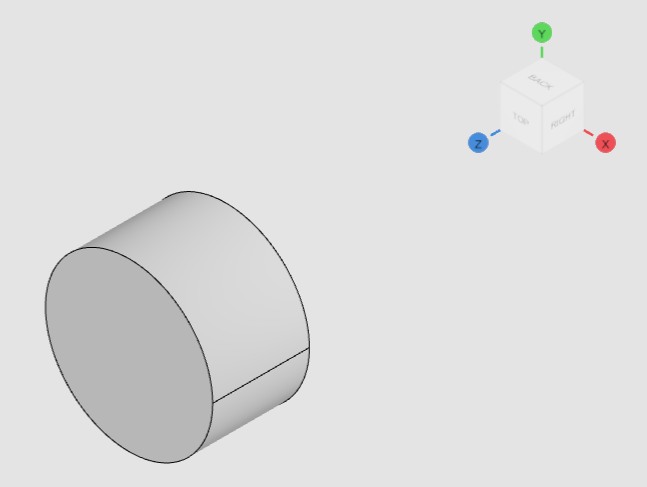
  • Create a cylinder with diameter = 50 and height = 100. We don't set any reference now, let the brackets empty.
const part = await api.createPart('CylinderPart')
const cyl = api.cylinder(part, [], 190, 110)
return part

As result you will see a simple cylinder.

drawing

Simple cylinder


2. Add some more features#

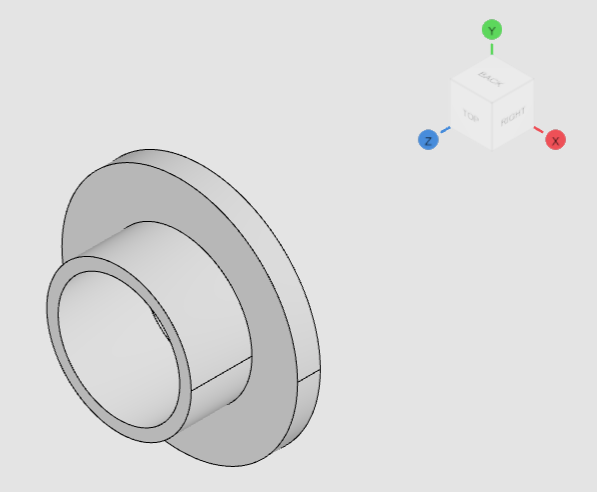
Let's add some more features to see what we can do with it. Maybe we could add another flat cylinder and one to subtract from the others, and then we get something like a flange. Follow the next steps:

  • Create a big flat cylinder with height = 30 and diameter = 310
  • Unite this new cylinder with the first one (Boolean Operation)
  • Create another cylinder with diameter = 30 and height = 100, which we will use for subtraction.
  • Subtract the created cylinder from the unified one.
const part = await api.createPart('CylinderPart')
const cyl1 = api.cylinder(part, [], 190, 110)
const cyl2 = api.cylinder(part, [], 310, 30)
const union = api.boolean(part, BooleanOperationType.UNION, [cyl1, cyl2])
const cyl3 = api.cylinder(part, [], 160, 110)
api.boolean(part, BooleanOperationType.SUBTRACTION, [union, cyl3])
return part

drawing

Using features to change cylinders

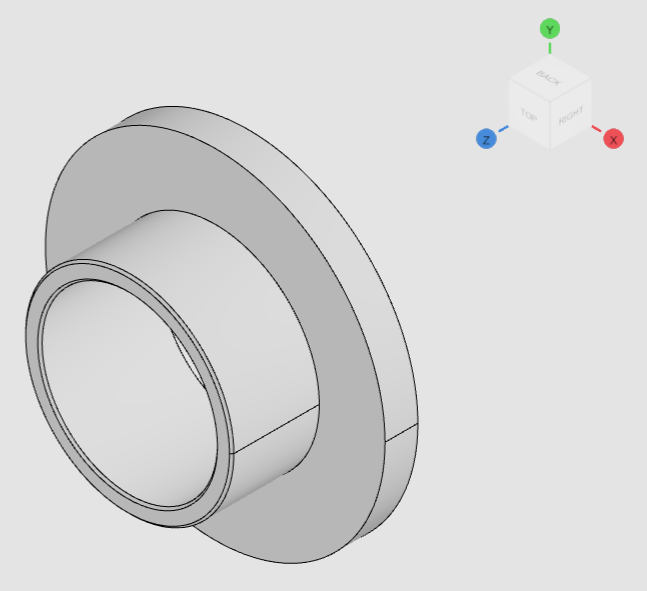
Let's make the flange look a bit more like a genuine flange. We should add some chamfers on the edges and some holes to the bottom cylinder for the screws. To set chamfers on it, we need to know the edge ids. The edge ids can be found by using the selectGeometry() method.

Add this code to the file and see what happens with the flange.

const part = await api.createPart('CylinderPart')
const cyl1 = api.cylinder(part, [], 190, 110)
const cyl2 = api.cylinder(part, [], 310, 30)
const union = api.boolean(part, BooleanOperationType.UNION, [cyl1, cyl2])
const cyl3 = api.cylinder(part, [], 160, 110)
api.boolean(part, BooleanOperationType.SUBTRACTION, [union, cyl3])
const selections = await api.selectGeometry([GraphicType.ARC, GraphicType.CIRCLE])
api.chamfer(part, ChamferType.EQUAL_DISTANCE, selections.map(sel => sel.graphicId), 2, 2, 45)
return part

As you can see, the code stops within the selectGeometry() method. You're able to make selections on the current state of the model. If you hover over the model, you can see which kind of selections are allowed. In this case only arc and circle selections are allowed. To get more information about the selectGeometry() method, see this chapter here.

drawing

Adding chamfers to edges interactively

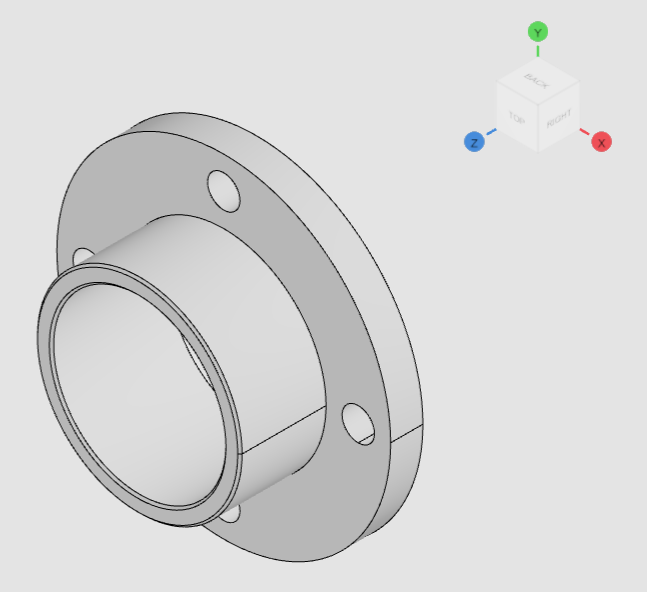
Now let's add some holes to bottom cylinder.

💡 Tip: Use linear or circular pattern to create the same feature multiple times in a row or around an axis


Follow the next steps:

  • Create a work coordinate system (WCS) at the position where we want to create the hole
  • Create a new cylinder with diameter = 30, height = 50 and the reference will be the WCS that we created the step before
  • Create a work axis in the middle of the cylinders. That means position = {0,0,0} and normal = {0,0,1}
  • Create a circular pattern, use the cylinder from the steps before to add it 4 times by an angle of 90°. Merge the solids.
  • Create a subtraction between the flange and the patterned cylinders to create the holes
const rotation = { x: 0, y: 0, z: 0 }
const offset = { x: 0, y: 125, z: 0 }
const origin = { x: 0, y: 0, z: 0 }
const zDir = { x: 0, y: 0, z: 1 }
const part = await api.createPart('CylinderPart')
const cyl1 = api.cylinder(part, [], 190, 110)
const cyl2 = api.cylinder(part, [], 310, 30)
const union = api.boolean(part, BooleanOperationType.UNION, [cyl1, cyl2])
const cyl3 = api.cylinder(part, [], 160, 110)
await api.boolean(part, BooleanOperationType.SUBTRACTION, [union, cyl3])
const selections1 = await api.selectGeometry([GraphicType.ARC, GraphicType.CIRCLE])
const chamfer = api.chamfer(part, ChamferType.EQUAL_DISTANCE, selections1.map(sel => sel.graphicId), 2, 2, 45)
const wcs = api.createWorkCoordSystem(part, WorkCoordSystemType.WCS_CUSTOM, [], offset, rotation, false, 'WCS')
const cyl4 = await api.cylinder(part, [wcs], 30, 50)
const selections2 = await api.selectGeometry([GraphicType.ARC, GraphicType.CIRCLE])
const waCenter = api.createWorkAxis(part, WorkAxisType.WA_CURVE, selections2.map(sel => sel.graphicId), origin, zDir, false, 'WACenter')
const pattern = api.circularPattern(part, [cyl4], [waCenter], { inverted: 0, angle: Math.PI / 2, count: 4, merged: 1})
api.boolean(part, BooleanOperationType.SUBTRACTION, [chamfer, pattern] )
return part

drawing

Finally added some holes around the center


3. Add expressions to make the model configurable#

In part modeling, we often work with expressions to make the part configurable. Expressions are like global variables. Easy to update, and they can depend on each other. That means we can change only one expression, but many others might also change, making the model look quite different. To get more information about using expressions, see chapter Expressions

Let's try it out and make the flange configurable with expressions.

  • Create an expression for thickness = 30 and the diameter = 190 of the upper cylinder (upperCylDiam). These two expressions we want to control directly.
  • Create a depending expression for the hole diameter of the flange (upperCylHoleDiam = upperCylDiam - thickness)
  • Create a depending expression for the diameter of the lower flat cylinder (lowerCylDiam = upperCylDiam + 120)
  • Create a depending expression for the offset of the circular holes (holeOffset = upperCylDiam + 60)
  • Add the created expression to the right features in the code.
  • We also changed the naming slightly to make it easier to understand.

See the following code snippet:

const rotation = { x: 0, y: 0, z: 0 }
const offset = { x: 0, y: 0, z: 0 }
const origin = { x: 0, y: 0, z: 0 }
const zDir = { x: 0, y: 0, z: 1 }
const thickness = 30
const upperCylDiam = 190
const holeOffset = (upperCylDiam / 2) + thickness
const holeOffset1Bottom = { x: 0, y: holeOffset, z: 0 }
const holeOffset1Top = { x: 0, y: holeOffset, z: thickness }
const flange = await api.createPart('Flange')
// Expressions
api.createExpressions(flange,
{ name: "thickness", value: 30 },
{ name: "upperCylDiam", value: 190 },
{ name: "upperCylHoleDiam", value: "upperCylDiam - thickness"},
{ name: "flangeHeight", value: 110},
{ name: "baseCylDiam", value: "upperCylDiam + 4 * thickness"},
{ name: "holeOffset", value: "(upperCylDiam / 2) + thickness"},
{ name: "holeCount", value: 4 },
{ name: "holeAngle", value: "C:PI * 2 / holeCount" },
)
// Create geometry
const wcsCenter = api.createWorkCoordSystem(flange, WorkCoordSystemType.WCS_CUSTOM, [], offset, rotation, false, 'WCSCenter')
const baseCyl = api.cylinder(flange, [wcsCenter], "ExpressionSet.baseCylDiam", "ExpressionSet.thickness")
const upperCyl = api.cylinder(flange, [wcsCenter], "ExpressionSet.upperCylDiam", "ExpressionSet.flangeHeight")
const flangeSolid1 = api.boolean(flange, BooleanOperationType.UNION, [baseCyl, upperCyl])
const subCylFlange = api.cylinder(flange, [wcsCenter], "ExpressionSet.upperCylHoleDiam", "ExpressionSet.flangeHeight")
await api.boolean(flange, BooleanOperationType.SUBTRACTION, [flangeSolid1, subCylFlange])
const selections1 = await api.selectGeometry([GraphicType.ARC, GraphicType.CIRCLE])
const flange2 = await api.chamfer(flange, ChamferType.EQUAL_DISTANCE, selections1.map(sel => sel.graphicId), 2, 2, 45)
const wcsHole1Bottom = api.createWorkCoordSystem(flange, WorkCoordSystemType.WCS_CUSTOM, [], holeOffset1Bottom, rotation, false, 'WCSBoltHoleBottom')
const subCylHole1 = await api.cylinder(flange, [wcsHole1Bottom], 30, 50)
const selections2 = await api.selectGeometry([GraphicType.ARC, GraphicType.CIRCLE])
const waCenter = await api.createWorkAxis(flange, WorkAxisType.WA_CURVE, selections2.map(sel => sel.graphicId), origin, zDir, false, 'WACenter')
const pattern = await api.circularPattern(flange, [subCylHole1], [waCenter], { inverted: 0, angle: 'ExpressionSet.holeAngle', count: 'ExpressionSet.holeCount', merged: 1})
await api.boolean(flange, BooleanOperationType.SUBTRACTION, [flange2, pattern] )
await api.createWorkCoordSystem(flange, WorkCoordSystemType.WCS_CUSTOM, [], holeOffset1Top, rotation, false, 'WCSBoltHoleTop')
return flange

4. Save the model in native file format#

Use the following code snippet and copy it at the end of your example:

// Save part
const dataOfb = await api.save('ofb')
if (dataOfb) {
const link = document.createElement('a')
link.href = window.URL.createObjectURL(new Blob([dataOfb], { type: 'application/octet-stream' }))
link.download = `FlangePrt.ofb`
link.click()
}

When you get to the code at runtime, you will be prompted to save the file on you local file system.

After saving this part in native file format ofb, we can load it with Buerligons and see the whole part history, including expressions. Later we will see how we can quickly develop configurators by code and update expressions by a single line of code with a significant effect on the part.